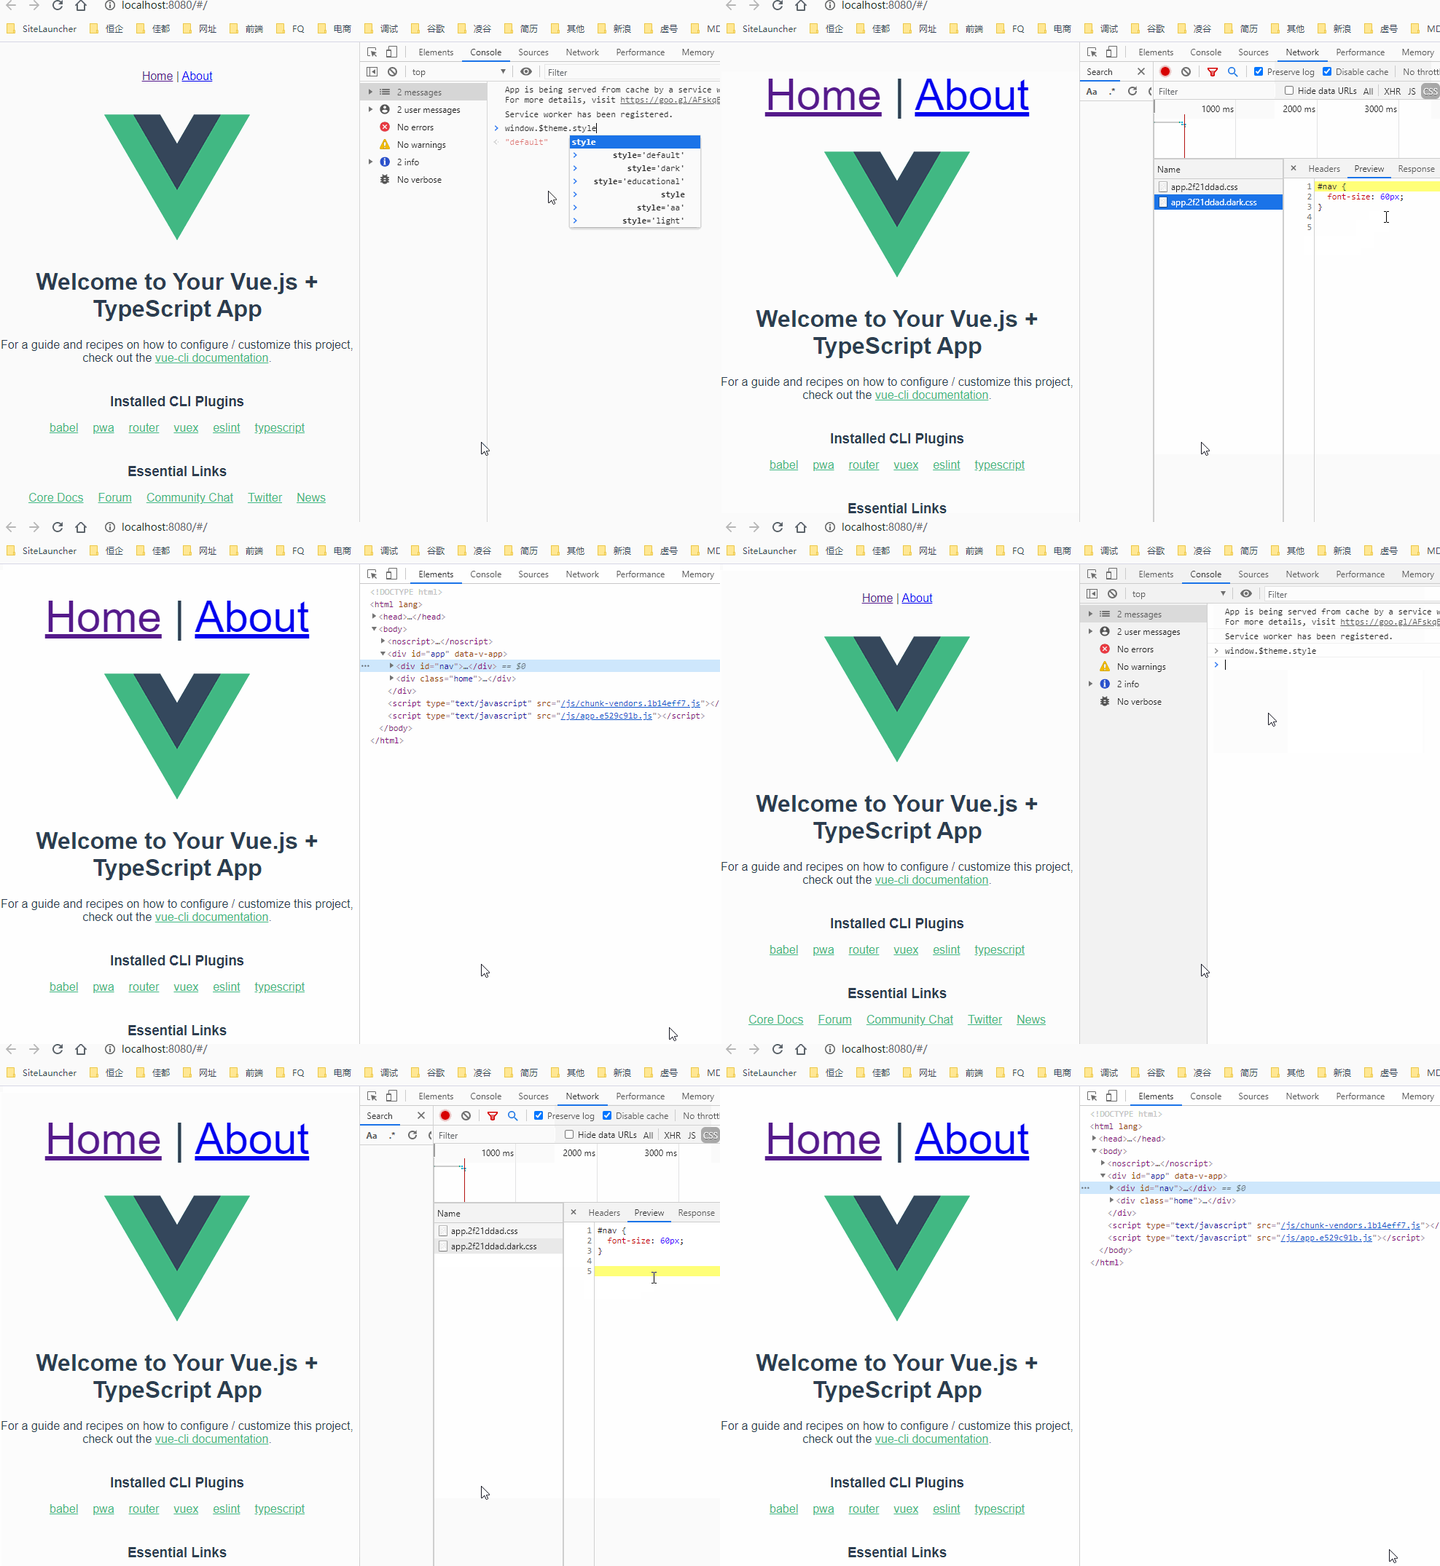
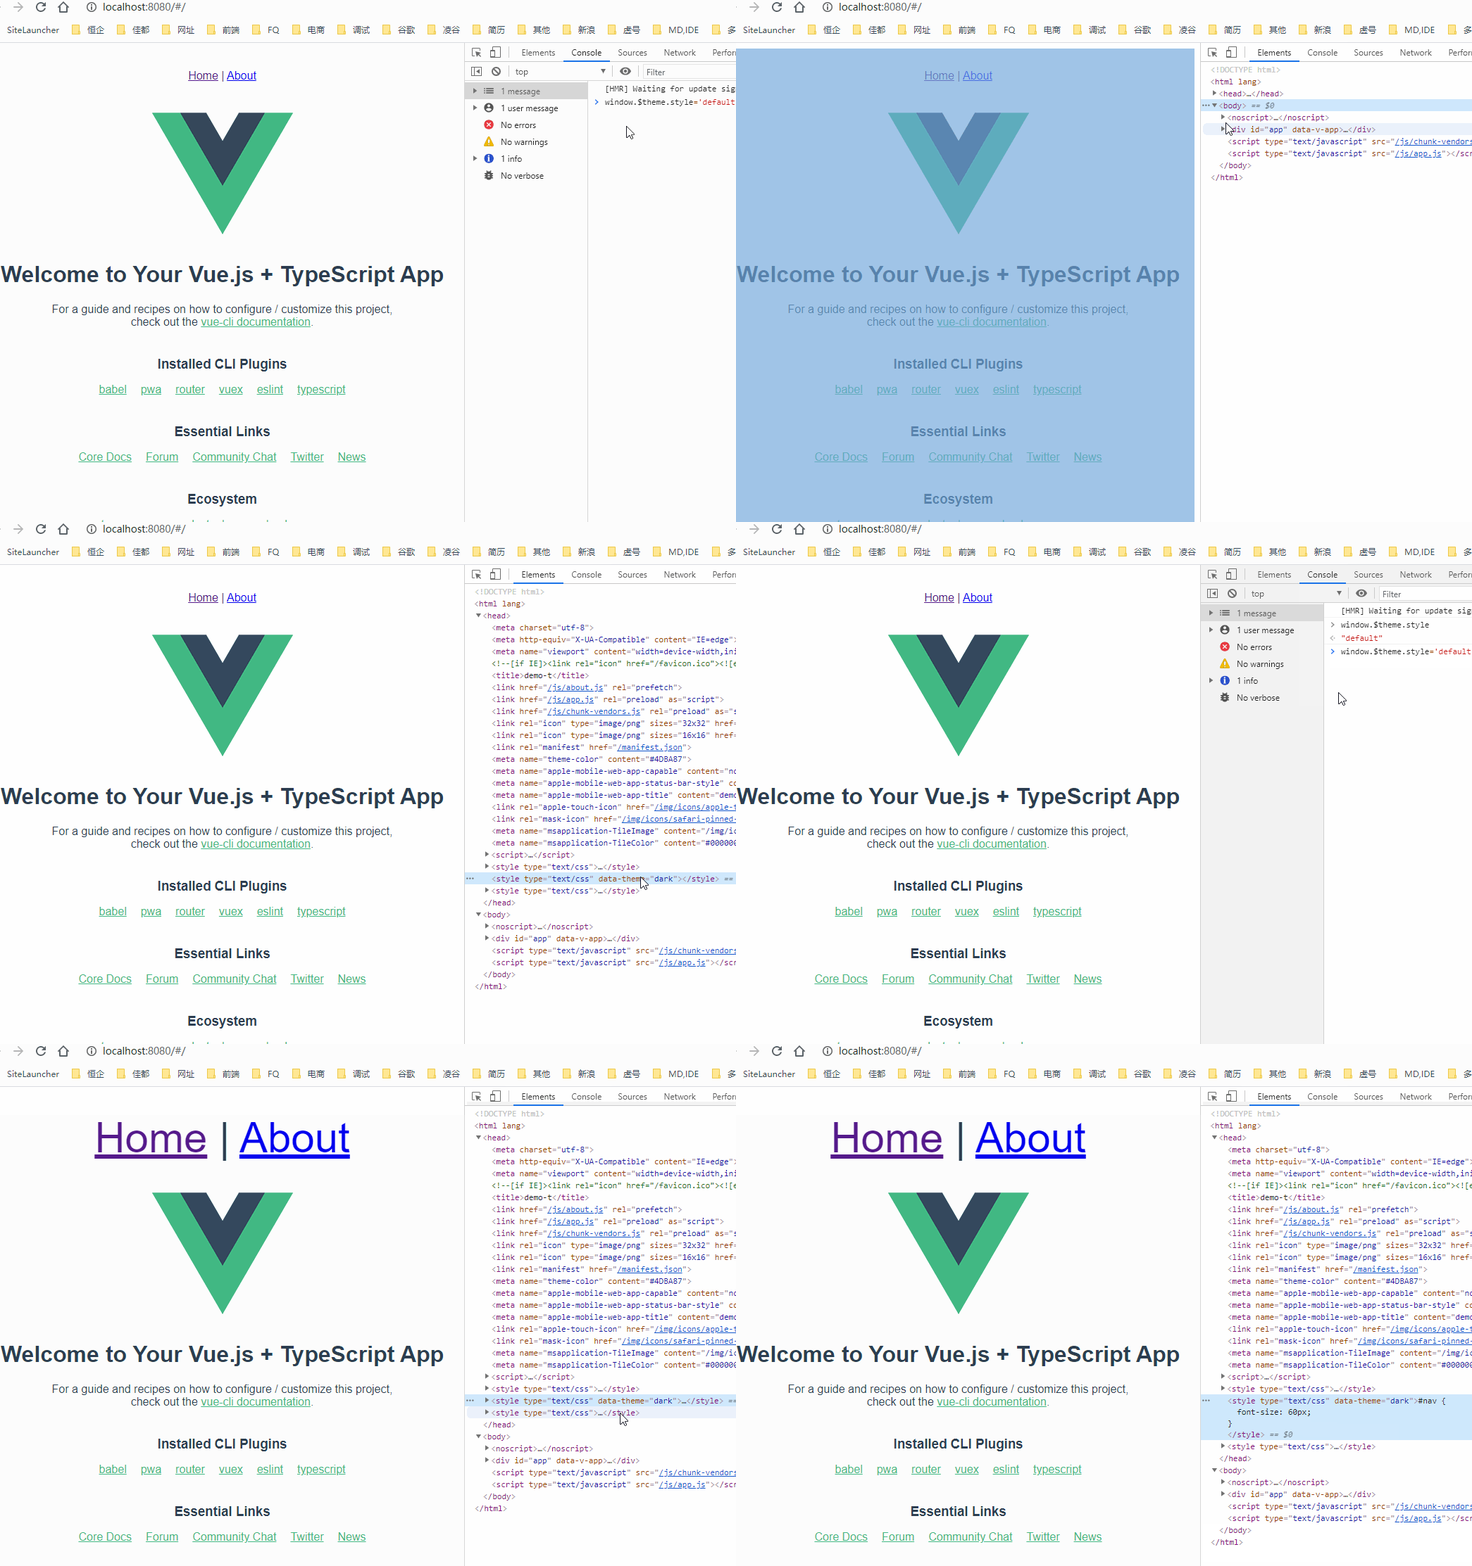
{"_id":"@94ai/vue-theme-peel","_rev":"3-10b50b470391cb090244072e5703180b","name":"@94ai/vue-theme-peel","dist-tags":{"latest":"1.0.1"},"versions":{"1.0.0":{"name":"@94ai/vue-theme-peel","version":"1.0.0","description":"vue换肤插件","keywords":["vue3/2,typescript,antd,element-ui,换肤,切换主题"],"main":"lib/index.js","scripts":{"dev:example":"webpack-dev-server --config=example/build/webpack.dev.js","build:example":"webpack-cli --config=example/build/webpack.build.js ","build":"webpack-cli --config=webpack.config.js","lint":"eslint src/** lib/** example/** --ext .js,.vue","start":"node server.js"},"auth":"zoujiahe","repository":{"type":"git","url":"https://gitee.com/xccjh/vue-theme-peel"},"dependencies":{"hash-sum":"^2.0.0","loader-utils":"^1.2.3"},"publishConfig":{"access":"public"},"devDependencies":{"https":"^1.0.0","express":"^4.17.1","@babel/core":"^7.2.2","@babel/plugin-transform-runtime":"^7.7.4","@babel/preset-env":"^7.3.1","autoprefixer":"^9.7.2","babel-eslint":"^10.0.3","babel-loader":"^8.0.6","clean-webpack-plugin":"^2.0.2","css-loader":"^3.2.0","element-ui":"^2.13.0","eslint":"^6.7.1","eslint-config-airbnb-base":"^14.0.0","eslint-plugin-import":"^2.18.2","eslint-plugin-vue":"^6.0.1","file-loader":"^5.0.2","html-webpack-plugin":"^3.2.0","less":"^3.10.1","less-loader":"^5.0.0","postcss-loader":"^3.0.0","url-loader":"^3.0.0","vue":"^2.6.10","vue-loader":"^15.7.1","vue-router":"^3.1.2","vue-template-compiler":"^2.6.10","webpack":"^4.36.1","webpack-cli":"^3.3.6","webpack-dev-server":"^3.8.0","webpack-sources":"^1.4.3"},"gitHead":"df31996928e7378c52d8c41c71ce48c49e36f242","_id":"@94ai/vue-theme-peel@1.0.0","_nodeVersion":"16.19.1","_npmVersion":"8.19.3","dist":{"integrity":"sha512-/pEmr6v1R2HAoDlIO49VWTsxns0z2g1xaGG9MJQPICArhLfDog522Vc8TMKsm44VQoxb8PUssS3vhj8GDAVk2A==","shasum":"2c0cc8f16c5d6a872a27af20052ab84ae0970fbc","tarball":"https://registry.npmjs.org/@94ai/vue-theme-peel/-/vue-theme-peel-1.0.0.tgz","fileCount":18,"unpackedSize":64077,"signatures":[{"keyid":"SHA256:jl3bwswu80PjjokCgh0o2w5c2U4LhQAE57gj9cz1kzA","sig":"MEUCIFz/15BRByxdLOBpNaHr6kOuboiasoCvs2nQiU+WMGGkAiEA2m0a8ZAZWVbDMHCyniDCcJBV4llds+e2w/zFQ6EjSH8="}]},"_npmUser":{"name":"94ai","email":"zjh15018707394@gmail.com"},"directories":{},"maintainers":[{"name":"94ai","email":"zjh15018707394@gmail.com"}],"_npmOperationalInternal":{"host":"s3://npm-registry-packages","tmp":"tmp/vue-theme-peel_1.0.0_1690181228785_0.9490904071358965"},"_hasShrinkwrap":false},"1.0.1":{"name":"@94ai/vue-theme-peel","version":"1.0.1","description":"vue换肤插件","keywords":["vue3/2,typescript,antd,element-ui,换肤,切换主题"],"main":"lib/index.js","scripts":{"dev:example":"webpack-dev-server --config=example/build/webpack.dev.js","build:example":"webpack-cli --config=example/build/webpack.build.js ","build":"webpack-cli --config=webpack.config.js","lint":"eslint src/** lib/** example/** --ext .js,.vue","start":"node server.js"},"auth":"zoujiahe","repository":{"type":"git","url":"https://gitee.com/xccjh/vue-theme-peel"},"dependencies":{"hash-sum":"^2.0.0","loader-utils":"^1.2.3"},"publishConfig":{"access":"public"},"devDependencies":{"https":"^1.0.0","express":"^4.17.1","@babel/core":"^7.2.2","@babel/plugin-transform-runtime":"^7.7.4","@babel/preset-env":"^7.3.1","autoprefixer":"^9.7.2","babel-eslint":"^10.0.3","babel-loader":"^8.0.6","clean-webpack-plugin":"^2.0.2","css-loader":"^3.2.0","element-ui":"^2.13.0","eslint":"^6.7.1","eslint-config-airbnb-base":"^14.0.0","eslint-plugin-import":"^2.18.2","eslint-plugin-vue":"^6.0.1","file-loader":"^5.0.2","html-webpack-plugin":"^3.2.0","less":"^3.10.1","less-loader":"^5.0.0","postcss-loader":"^3.0.0","url-loader":"^3.0.0","vue":"^2.6.10","vue-loader":"^15.7.1","vue-router":"^3.1.2","vue-template-compiler":"^2.6.10","webpack":"^4.36.1","webpack-cli":"^3.3.6","webpack-dev-server":"^3.8.0","webpack-sources":"^1.4.3"},"gitHead":"162d17761f2d346e02b36a81980319d10f039146","_id":"@94ai/vue-theme-peel@1.0.1","_nodeVersion":"16.19.1","_npmVersion":"8.19.3","dist":{"integrity":"sha512-yTIUVF03HR5nXNY3RhaDUy8jiMMe2192qBAm52bs2fGv/Q5mdRxp1UlfBKq8XdqTdPHUhnK4HltZMlsoRy+P7Q==","shasum":"faec10909c72abf719da677133d7c9ba128237e6","tarball":"https://registry.npmjs.org/@94ai/vue-theme-peel/-/vue-theme-peel-1.0.1.tgz","fileCount":18,"unpackedSize":64077,"signatures":[{"keyid":"SHA256:jl3bwswu80PjjokCgh0o2w5c2U4LhQAE57gj9cz1kzA","sig":"MEUCIQCXArceypYJtoFxoQWhgc3+G5zjB/evswWdInbXnZFpKAIgOinsvRRXA8PtgoioeepcF/4BRxpbsKFPcd9oVuSGmDo="}]},"_npmUser":{"name":"94ai","email":"zjh15018707394@gmail.com"},"directories":{},"maintainers":[{"name":"94ai","email":"zjh15018707394@gmail.com"}],"_npmOperationalInternal":{"host":"s3://npm-registry-packages","tmp":"tmp/vue-theme-peel_1.0.1_1690181415378_0.16713613602719835"},"_hasShrinkwrap":false}},"time":{"created":"2023-07-24T06:47:08.705Z","1.0.0":"2023-07-24T06:47:09.020Z","modified":"2024-05-24T09:11:34.611Z","1.0.1":"2023-07-24T06:50:15.554Z"},"maintainers":[{"email":"liuxiangxiang1992@gmail.com","name":"louislxx"},{"email":"zjh15018707394@gmail.com","name":"nfai"}],"description":"vue换肤插件","keywords":["vue3/2,typescript,antd,element-ui,换肤,切换主题"],"repository":{"type":"git","url":"https://gitee.com/xccjh/vue-theme-peel"},"readme":"## @94ai/vue-theme-peel\r\n\r\nvue换肤插件\r\n\r\n## 安装\r\n\r\n> 支持`webpack v4.x`和`html-webpack-plugin v3.x`(支持vue-cli创建vue3/2项目,如vue3+typescript+ant/vant或element-ui)\r\n\r\n```bash\r\n$ yarn add @94ai/vue-theme-peel -D\r\n```\r\n\r\n## 使用\r\n### 配置插件\r\n```js\r\n// vue.config.js\r\nconst ThemeSwitchPlugin = require('@94ai/vue-theme-peel')\r\nconst dev = process.env.NODE_ENV === 'development'\r\nconst publicPath = 'http://localhost:8089/';\r\n\r\nmodule.exports = {\r\n  chainWebpack: (config) => {\r\n    const newLoader = {\r\n      loader: ThemeSwitchPlugin.loader // 👈 替换掉默认的所有样式处理loader\r\n    }\r\n    ;['vue'].forEach((item) => {\r\n      ['css', 'scss', 'sass', 'less', 'stylus'].forEach((style) => {\r\n        const originUse = config.module.rule(style).oneOf(item).toConfig().use\r\n        originUse.splice(0, 1, newLoader)\r\n        config.module.rule(style).oneOf(item).uses.clear()\r\n        config.module.rule(style).oneOf(item).merge({ use: originUse })\r\n      })\r\n    })\r\n    if (!dev) {\r\n      config.devtool('none')  // 👈 关掉css映射\r\n      config\r\n        .plugins.delete('extract-css')  //  👈 替换掉默认的extract-css插件\r\n      config\r\n        .plugin('ThemeSwitchPluginArgs')  // 👈 使用ThemeSwitchPlugin\r\n        .use(ThemeSwitchPlugin, [{\r\n          filename: 'static/css/[name].[hash:8].css',\r\n          chunkFilename: 'static/css/[name].[contenthash:8].css'\r\n        }]).before('optimize-css')\r\n      config.optimization.minimizer('terser').tap(args => {  // 👈 关掉js映射\r\n        args[0].sourceMap = false\r\n        return args\r\n      })\r\n      config\r\n          .plugin('ThemeSwitchPluginInject') //  👈 注入主题变量工具函数\r\n          .use(ThemeSwitchPlugin.inject,[{\r\n                publicPath  // 👈 配置动态加载的publicPath\r\n            }])\r\n    }else {\r\n       config\r\n        .plugin('ThemeSwitchPluginInject')\r\n        .use(ThemeSwitchPlugin.inject)\r\n    }\r\n    config.plugin('html').tap(args => {\r\n      const param = args[0]\r\n      param.minify = {  // 👈 优化压缩\r\n        removeComments: true,\r\n        collapseWhitespace: true,\r\n        removeAttributeQuotes: true\r\n      }\r\n      param.chunksSortMode = 'dependency'\r\n      return [param]\r\n    })\r\n \r\n  }\r\n}\r\n```\r\n### 组件使用\r\n任意组件中使用theme标识区分不同的主题,开发环境动态生成style标签,生产环境动态加载link标签\r\n```vue\r\n<template>\r\n  <div id=\"nav\">\r\n    <router-link to=\"/\">Home</router-link> |\r\n    <router-link to=\"/about\">About</router-link>\r\n  </div>\r\n  <router-view/>\r\n</template>\r\n\r\n<style lang=\"less\">  👈 没有标志默认会应用\r\n#app {\r\n  font-family: Avenir, Helvetica, Arial, sans-serif;\r\n  -webkit-font-smoothing: antialiased;\r\n  -moz-osx-font-smoothing: grayscale;\r\n  text-align: center;\r\n  color: #2c3e50;\r\n}\r\n\r\n#nav {\r\n  padding: 30px;\r\n\r\n}\r\n</style>\r\n<style lang=\"less\" theme='dark'> // 👈 theme标志区分暗色主题,只用window.$theme.style === 'dark' 才会应用\r\n  #nav {\r\n    font-size: 60px;\r\n  }\r\n</style>\r\n```\r\n### 开发阶段\r\n![hq-seeai-cli使用演示](https://xccjhzjh.oss-cn-hongkong.aliyuncs.com/xccjh-images/theme.gif)\r\n### 线上环境\r\n![hq-seeai-cli使用演示](https://xccjhzjh.oss-cn-hongkong.aliyuncs.com/xccjh-images/themelocal.gif)\r\n\r\n## 原理\r\n\r\n### 开发阶段\r\n在开发阶段，对于vue项目，通用做法是将样式通过`vue-style-loader`提取出来，然后通过`<style>`标签动态插入DOM。\r\n\r\n通过查看`vue-style-loader`的源码可知，样式`<style>`的插入与更新，是通过 `/lib/addStylesClient.js` 这个文件暴露出来的方法实现的。\r\n\r\n首先，我们可以从`this.resourceQuery`解析出样式对应的主题名称，供后续样式插入的时候判断。\r\n\r\n`options.theme = /\\btheme=(\\w+?)\\b/.exec(this.resourceQuery) && RegExp.$1;`\r\n\r\n这样，样式对应的主题名称就随着options对象一起传入到了addStylesClient方法中。\r\n\r\n关于`this.resourceQuery`，可以查看webpack的文档。\r\n\r\n然后，我们通过改写addStyle方法，根据当前主题加载对应的样式。同时，监听主题名称变化的事件，在回调函数中设置当前主题对应的样式并删除非当前主题的样式。\r\n\r\n```js\r\nif (options.theme && window.$theme) {\r\n  // 初次加载时，根据主题名称加载对应的样式\r\n  if (window.$theme.style === options.theme) {\r\n    update(obj);\r\n  }\r\n\r\n  const { theme } = options;\r\n  // 监听主题名称变化的事件，设置当前主题样式并删除非当前主题样式\r\n  window.addEventListener('theme-change', function onThemeChange() {\r\n    if (window.$theme.style === theme) {\r\n      update(obj);\r\n    } else {\r\n      remove();\r\n    }\r\n  });\r\n\r\n  // 触发hot reload的时候，调用updateStyle更新<style>标签内容\r\n  return function updateStyle(newObj /* StyleObjectPart */) {\r\n    if (newObj) {\r\n      if (\r\n        newObj.css === obj.css\r\n        && newObj.media === obj.media\r\n        && newObj.sourceMap === obj.sourceMap\r\n      ) {\r\n        return;\r\n      }\r\n\r\n      obj = newObj;\r\n      if (window.$theme.style === options.theme) {\r\n        update(obj);\r\n      }\r\n    } else {\r\n      remove();\r\n    }\r\n  };\r\n}\r\n```\r\n这样，当更改window.$theme.style时触发theme-change会动态处理不同主题style的产生和销毁,我们就支持了开发阶段多主题的切换。\r\n\r\n### 线上环境\r\n\r\n对于线上环境，因为我们可以使用`mini-css-extract-plugin`将css文件分chunk导出成多个css文件并动态加载，所以我们需要解决：如何按主题导出样式文件，如何动态加载，如何在html入口只加载当前主题的样式文件。\r\n\r\n我们先简单介绍下mini-css-extract-plugin导出css样式文件的工作流程:\r\n1. 第一步：在loader的pitch阶段，将样式转为dependency(该插件使用了一个扩展自webpack.Dependency的自定义CssDependency)；\r\n2. 第二步：在plugin的renderManifest钩子中，调用renderContentAsset方法，用于自定义css文件的输出结果。该方法会将一个js模块依赖的多个样式输出到一个css文件当中。\r\n3. 第三步：在entry的requireEnsure钩子中，根据chunkId找到对应的css文件链接，通过创建link标签实现动态加载。这里会在源码中插入一段js脚本用于动态加载样式css文件。\r\n4. 接下来，html-webpack-plugin会将entry对应的css注入到html中，保障入口页面的样式渲染。\r\n\r\n#### 按主题导出样式文件\r\n我们需要改造renderContentAsset方法，在样式文件的合并逻辑中加入theme的判断。核心逻辑如下：\r\n\r\n```js\r\nconst themes = [];\r\n\r\n// eslint-disable-next-line no-restricted-syntax\r\nfor (const m of usedModules) {\r\n  const source = new ConcatSource();\r\n  const externalsSource = new ConcatSource();\r\n\r\n  if (m.sourceMap) {\r\n    source.add(\r\n      new SourceMapSource(\r\n        m.content,\r\n        m.readableIdentifier(requestShortener),\r\n        m.sourceMap,\r\n      ),\r\n    );\r\n  } else {\r\n    source.add(\r\n      new OriginalSource(\r\n        m.content,\r\n        m.readableIdentifier(requestShortener),\r\n      ),\r\n    );\r\n  }\r\n\r\n  source.add('\\n');\r\n\r\n  const theme = m.theme || 'default';\r\n  if (!themes[theme]) {\r\n    themes[theme] = new ConcatSource(externalsSource, source);\r\n    themes.push(theme);\r\n  } else {\r\n    themes[theme] = new ConcatSource(themes[theme], externalsSource, source);\r\n  }\r\n}\r\n\r\nreturn themes.map((theme) => {\r\n  const resolveTemplate = (template) => {\r\n    if (theme === 'default') {\r\n      template = template.replace(REGEXP_THEME, '');\r\n    } else {\r\n      template = template.replace(REGEXP_THEME, `$1${theme}$2`);\r\n    }\r\n    return `${template}?type=${MODULE_TYPE}&id=${chunk.id}&theme=${theme}`;\r\n  };\r\n\r\n  return {\r\n    render: () => themes[theme],\r\n    filenameTemplate: resolveTemplate(options.filenameTemplate),\r\n    pathOptions: options.pathOptions,\r\n    identifier: options.identifier,\r\n    hash: options.hash,\r\n  };\r\n});\r\n```\r\n\r\n在这里我们定义了一个resolveTemplate方法，对输出的css文件名支持了[theme]这一占位符。同时，在我们返回的文件名中，带入了一串query，这是为了便于在编译结束之后，查询该样式文件对应的信息。\r\n\r\n#### 动态加载样式css文件\r\n这里的关键就是根据chunkId找到对应的css文件链接，在mini-css-extract-plugin的实现中，可以直接计算出最终的文件链接，但是在我们的场景中却不适用，因为在编译阶段，我们不知道要加载的theme是什么。一种可行的思路是，插入一个resolve方法，在运行时根据当前theme解析出完整的css文件链接并插入到DOM中。这里我们使用了另外一种思路：收集所有主题的css样式文件地址并存在一个map中，在动态加载时，根据chunkId和theme从map中找出最终的css文件链接。\r\n\r\n以下是编译阶段注入代码的实现：\r\n```js\r\ncompilation.mainTemplate.hooks.requireEnsure.tap(\r\n  PLUGIN_NAME,\r\n  (source) => webpack.Template.asString([\r\n    source,\r\n    '',\r\n    `// ${PLUGIN_NAME} - CSS loading chunk`,\r\n    '$theme.__loadChunkCss(chunkId)', \r\n  ]),\r\n);\r\n```\r\n\r\n以下是在运行阶段根据chunkId加载css的实现：\r\n```js\r\nfunction loadChunkCss(chunkId) {\r\n  const id = `${chunkId}#${theme.style}`;\r\n  if (resource && resource.chunks) {\r\n    util.createThemeLink(resource.chunks[id]);\r\n  }\r\n}\r\n```\r\n\r\n#### 注入entry对应的css文件链接\r\n\r\n因为分多主题之后，entry可能会根据多个主题产生多个css文件，这些都会注入到html当中，所以我们需要删除非默认主题的css文件引用。html-webpack-plugin提供了钩子帮助我们进行这些操作。注册alterAssetTags钩子的回调，可以把所有非默认主题对应的link标签删去：\r\n\r\n```js\r\ncompilation.hooks.htmlWebpackPluginAlterAssetTags.tapAsync(PLUGIN_NAME, (data, callback) => {\r\n  data.head = data.head.filter((tag) => {\r\n    if (tag.tagName === 'link' && REGEXP_CSS.test(tag.attributes && tag.attributes.href)) {\r\n      const url = tag.attributes.href;\r\n      if (!url.includes('theme=default')) return false;\r\n      // eslint-disable-next-line no-return-assign\r\n      return !!(tag.attributes.href = url.substring(0, url.indexOf('?')));\r\n    }\r\n    return true;\r\n  });\r\n  data.plugin.assetJson = JSON.stringify(\r\n    JSON.parse(data.plugin.assetJson)\r\n      .filter((url) => !REGEXP_CSS.test(url) || url.includes('theme=default'))\r\n      .map((url) => (REGEXP_CSS.test(url) ? url.substring(0, url.indexOf('?')) : url)),\r\n  );\r\n\r\n  callback(null, data);\r\n});\r\n```\r\n\r\n#### 获取和设置当前主题\r\n通过Object.defineProperty拦截当前主题的取值和赋值操作触发theme-change，t同时可以将用户选择的主题值存在本地缓存，下次打开页面的时候就是当前设置的主题了。\r\n```js\r\nconst theme = {};\r\nObject.defineProperties(theme, {\r\n  style: {\r\n    configurable: true,\r\n    enumerable: true,\r\n    get() {\r\n      return store.get();\r\n    },\r\n    set(val) {\r\n      const oldVal = store.get();\r\n      const newVal = String(val || 'default');\r\n      if (oldVal === newVal) return;\r\n      store.set(newVal);\r\n      window.dispatchEvent(new CustomEvent('theme-change', { bubbles: true, detail: { newVal, oldVal } }));\r\n    },\r\n  },\r\n});\r\n```\r\n\r\n#### 加载主题对应的css文件\r\n动态加载css文件通过js创建link标签的方式即可实现，唯一需要注意的点是，切换主题后link标签的销毁操作。考虑到创建好的link标签本质上也是个对象，还记得我们之前存css样式文件地址的map吗？创建的link标签对象的引用也可以存在这个map上，这样就能够快速找到主题对应的link标签了。\r\n```js\r\nconst resource = window.$themeResource;\r\n\r\n// NODE_ENV = production\r\nif (resource) {\r\n  // 加载entry\r\n  const currentTheme = theme.style;\r\n  if (resource.entry && currentTheme && currentTheme !== 'default') {\r\n    Object.keys(resource.entry).forEach((id) => {\r\n      const item = resource.entry[id];\r\n      if (item.theme === currentTheme) {\r\n        util.createThemeLink(item);\r\n      }\r\n    });\r\n  }\r\n\r\n  // 更新theme\r\n  window.addEventListener('theme-change', (e) => {\r\n    const newTheme = e.detail.newVal || 'default';\r\n    const oldTheme = e.detail.oldVal || 'default';\r\n\r\n    const updateThemeLink = (obj) => {\r\n      if (obj.theme === newTheme && newTheme !== 'default') {\r\n        util.createThemeLink(obj);\r\n      } else if (obj.theme === oldTheme && oldTheme !== 'default') {\r\n        util.removeThemeLink(obj);\r\n      }\r\n    };\r\n\r\n    if (resource.entry) {\r\n      Object.keys(resource.entry).forEach((id) => {\r\n        updateThemeLink(resource.entry[id]);\r\n      });\r\n    }\r\n\r\n    if (resource.chunks) {\r\n      Object.keys(resource.chunks).forEach((id) => {\r\n        updateThemeLink(resource.chunks[id]);\r\n      });\r\n    }\r\n  });\r\n}\r\n```\r\n\r\n#### 最后\r\n我们通过webpack的loader和plugin，把样式文件按主题切分成了单个的css文件；并通过一个单独的模块实现了entry和chunk对应主题css文件的加载和主题动态切换。接下来需要做的就是，注入css资源列表到一个全局变量上，以便window.$theme可以通过这个全局变量去查找样式css文件。\r\n这一步我们依然使用html-webpack-plugin提供的钩子来帮助我们完成：\r\n```js\r\ncompilation.hooks.htmlWebpackPluginAfterHtmlProcessing.tapAsync(PLUGIN_NAME, (data, callback) => {\r\n  const resource = { entry: {}, chunks: {} };\r\n  Object.keys(compilation.assets).forEach((file) => {\r\n    if (REGEXP_CSS.test(file)) {\r\n      const query = loaderUtils.parseQuery(file.substring(file.indexOf('?')));\r\n      const theme = { id: query.id, theme: query.theme, href: file.substring(0, file.indexOf('?')) };\r\n      if (data.assets.css.indexOf(file) !== -1) {\r\n        resource.entry[`${theme.id}#${theme.theme}`] = theme;\r\n      } else {\r\n        resource.chunks[`${theme.id}#${theme.theme}`] = theme;\r\n      }\r\n    }\r\n  });\r\n\r\n  data.html = data.html.replace(/(?=<\\/head>)/, () => {\r\n    const script = themeScript.replace('window.$themeResource', JSON.stringify(resource));\r\n    return `<script>${script}</script>`;\r\n  });\r\n\r\n  callback(null, data);\r\n});\r\n\r\n```\r\n\r\n#### 实现主题切换\r\n控制台或代码中执行:\r\n```js\r\nwindow.$theme.style ='xxx'; // 👈  会触发theme-change从而根据开发或者生产环境去对应获取主题\r\n```\r\n","readmeFilename":"README.md"}