This is GoJS 2.0 Beta. See the changes here


We maintain a GitHub Repository, which you can star to follow version updates. We also notify of changes on Twitter.
GoJS has been rewritten in TypeScript. A source license will include .ts source files as well as .js sources.
GoJS can be compiled from the TypeScript source files. Dynamically building GoJS this way allows unused modules/code to be removed. See the new Intro page on building GoJS from TypeScript sources
GoJS can run in DOM-less environments, like Node, without any dependencies. See the new Introduction page on GoJS with Node.js.
GoJS cannot guarantee accurate Picture and TextBlock measuring in DOM-less environments,
so if you do not set desiredSize on TextBlocks or Pictures,
you may want to use GoJS inside of a headless browser project, like Chrome's Puppeteer.
We detail how to use GoJS with Puppeteer in the Server Side Images
Introduction page.
DOM-less environments can be used for server-side work, such as computing complex layouts. Headless environments such as Puppeteer can be used to do layout calculations or to make server-side images of Diagrams.
See the note about Diagram.viewSize below.
DraggingOptions holds properties for Part-moving operations, and DraggingInfo holds relative positions of dragged objects, for use in snapping and cancellation. The DraggingTool has an instance of this class, and setting properties like DraggingTool.isGridSnapEnabled modifies this instance. If the Diagram has no DraggingTool associated with it, it falls back to the default properties of the class. You can create your own to pass to part-moving methods. Typically you do not need to create an instance of this class.
Moving parts has been reworked. Diagram.moveParts, Diagram.computeMove, and CommandHandler.computeEffectiveCollection now accept an additional argument for a DraggingOptions instance. This allows fine-grained control over programmatic moving of nodes. Typically, these options are supplied by the DraggingTool.dragOptions instance.
DraggingTool.computeMove has been moved to Diagram.computeMove, and DraggingTool.computeEffectiveCollection has been moved to CommandHandler.computeEffectiveCollection. These methods remain on their original class for compatibility and ease of overriding.
callback and callbackTimeout options.
If a callback is specified, the methods will instead return null, and image creation will wait until all Diagram Picture sources are loaded
before creating the image and invoking the callback.
samplesTS folder in the kit.
In order to shrink the size of the GoJS library we no longer define most predefined figures in the library. Instead, you can find all of their definitions in the Figures.js file. You can load this file or simply load only those figures that you want to use by copying their definitions into your code. For example, the Shapes sample loads this file.
A number of very common figures remain predefined in version 2.0. The figures that remain in 2.0 are: "Rectangle", "Square", "RoundedRectangle", "Border", "Ellipse", "Circle", "TriangleRight", "TriangleDown", "TriangleLeft", "TriangleUp", "Triangle", "Diamond", "LineH", "LineV", "BarH", "BarV", "MinusLine", "PlusLine", "XLine".
Note also that the definitions that are in the Figures.js file are not entirely the same as their definitions in version 1.*. A number of figures have been improved and some figure parameters have been added or changed meaning. To use the old predefined figures, you can load or copy from the "extensions/Figures.js" file of an earlier version of GoJS.
The GoJS List, Set, and Map constructors no longer take type arguments and no longer do type checking in JavaScript.
However, when using TypeScript these classes are now generic and will do type checking at compile time.
In JavaScript, instead of new go.List(go.Point), write new go.List().
You can still provide an argument, but it is not used and not checked.
In TypeScript, instead of new go.List(go.Point), write new go.List<go.Point>(),
and the TypeScript compiler will enforce the List element typing.
All three constructors now take an optional Iterable or Array argument that provides the initial elements for the new collection.
In a future major version, we may replace go.Map with enhanced ES6 Map and go.Set with ES6 Set classes.
Map and Set collections.
This may affect data-bindings. You should make sure that any data bindings are returning possible type values such as go.Panel.Horizontal.
Data binding Panel.type without using a conversion function will not work with old data, since the property has changed type.
offsetX/offsetY of GraphObject.alignmentFocus has been reversed.
If you are using the offsetX/offsetY values in GraphObject.alignmentFocus, this may cause your panels to be arranged differently.
You will need to flip the sign to retain compatibility.
This change is to rectify a design inconsistency with Spot Panel elements. The offsetX/offsetY values now correctly offset the alignment focal point,
and not the Spot Panel's element itself.
The only use for this property was with the "SelectionDeleting" DiagramEvent in order to prevent the user from deleting the selection.
Where one might have written this Diagram listener:
"SelectionDeleting": function(e) {
if (e.diagram.selection.any(function(p) { return p.data.key.indexOf("e") >= 0; })) {
e.cancel = true;
}
}
one can write the equivalent functionality with this CommandHandler.canDeleteSelection method override:
"commandHandler.canDeleteSelection": function() {
return !this.diagram.selection.any(function(p) { return p.data.key.indexOf("e") >= 0; })
&& go.CommandHandler.prototype.canDeleteSelection.call(this);
}
Overriding the method supports the updating/enablement of commands that call CommandHandler.deleteSelection.
Furthermore not having a "cancel" property on the DiagramEvent avoids any potential problems that might occur if there
are multiple listeners for the "SelectionDeleting" event.
The "SelectionDeleting" DiagramEvent remains useful, but not for controlling whether or not the deletion should happen.
Updated the styling of buttons. Buttons are now rounded rectangles and have an effect when pressed. Some predefined buttons have increased a small amount in size:
If you wish to use the GoJS library for your private evaluation, you may do so only under the terms of the Evaluation License Agreement.
You can download the whole web site for this version of GoJS by saving and unzipping:
We also maintain a GitHub Repository of all libraries, documentation, samples, and extensions. This allows you to search through documentation and code online.
The contents of both the ZIP file and the GitHub repository are exactly what you find at the GoJS web site. Having everything downloaded to your development machine allows you to easily search the JavaScript code and to modify the samples for experimentation.
You can also download GoJS via Node package manager (npm):
$ npm install gojs --save.
Or download the GoJS library files via NuGet:
PM> Install-Package Northwoods.GoJS.
Or you can link to a CDN.
The GoJS library comes in both "debug" and "release" variations in the release directory:
We recommend that you use go-debug.js while doing your initial development --
it is more likely to signal errors or provide meaningful error messages than when using go.js.
Always remember to look at the console log to see if there are any error or warning messages.
After purchasing a license, you may deploy by acquiring a license key for your web site's domain. See Deployment for more discussion.
When upgrading to a newer version, please read the Change Log. In addition to getting new debug and release libraries, don't forget to use the latest TypeScript definition file, go.d.ts, that is also in the release directory.
More information is at GoJS home.
GoJS is a feature-rich JavaScript library for implementing custom interactive diagrams and complex visualizations across modern web browsers and platforms. GoJS makes constructing JavaScript diagrams of complex nodes, links, and groups easy with customizable templates and layouts.
GoJS offers many advanced features for user interactivity such as drag-and-drop, copy-and-paste, in-place text editing, tooltips, context menus, automatic layouts, templates, data binding and models, transactional state and undo management, palettes, overviews, event handlers, commands, and an extensible tool system for custom operations.
GoJS is implemented in TypeScript and can be used as a JavaScript library or built into your project from TypeScript sources. GoJS normally runs completely in the browser, rendering to an HTML5 Canvas element or SVG without any server-side requirements. It can also run in headless or server environments, like Node. GoJS does not depend on any libraries or frameworks, so it should work with any HTML or JavaScript framework or with no framework at all.
Build custom modeling environments and domain-specific visual languages using the powerful features of GoJS. Provide both a system editor and a read-only status monitor using shared code and templates. Simultaneously show alternative visualizations of the same data in different diagrams. Implement drill-down using expansion of subtrees and subgraphs or a detailed view in another diagram.
GoJS is remarkably simple for such a powerful and flexible system. Our thorough documentation introduces the basic concepts and demonstrate typical features that most apps want to offer. Nodes and links can be arbitrarily detailed according to the needs of the application. The API consists of only a few dozen important classes which encapsulate many useful features that interact with each other. There are many properties that permit simple customizations; some methods may be overridden for more complicated customizations.
Run over 175 sample apps that demonstrate flowcharts, org charts, mind maps, UML diagrams, BPMN diagrams, graph editors, data visualization, custom tools and layouts, and much more.
Get started with a step-by-step description of how to build a JavaScript diagram in HTML using GoJS and some model data.
Get a copy of the library and all of the samples, extensions, and documentation. Search the JavaScript code and modify the samples to start your app.
Read our introduction for a overview of GoJS concepts and features, including hundreds of live interactive examples embedded right in each page.
Evaluate the full library without any limitations. Register with us and get free support for a month to help build your app.
Read our comprehensive documentation for an in-depth reference of the properties and methods of all of the JavaScript classes.
When upgrading to a newer version, please read the Change Log.
You can explore the newest features and samples in the GoJS Beta for the next version, if a next version is available. Read the beta change log for the new features. Please note that our GitHub directory does not have the beta files.
NORTHWOODS SOFTWARE CORPORATION
Software License Agreement
This Software License Agreement (this �Agreement�) is a legal agreement
between Northwoods Software Corporation, a New Hampshire corporation (�Northwoods�), and you, either an
individual or a single entity.� This
Software License Agreement sets forth the terms and conditions under which
Northwoods grants to you a license to use one or more computer software products
of Northwoods and Northwoods� related documentation therefor.� Certain capitalized terms used in this
Agreement are defined in Section 1.0 below.
Each Licensed Product is identified in a License
Certificate issued by Northwoods to you.�
If two or more Licensed Products are listed on a License Certificate, the
License shall apply to each such Licensed Product.
This Agreement sets forth the terms and conditions
applicable to your License of the Licensed Software and the Documentation.� Please note that, as more particularly set
forth in this Agreement, certain of the terms and conditions set forth in this
Agreement may not be applicable to your License, depending on the type of
License that you purchased and the terms of your License Certificate.
***�� IMPORTANT NOTICE�� ***
BY
INSTALLING, COPYING, OR OTHERWISE USING ANY OF THE LICENSED SOFTWARE, YOU AGREE
TO BE BOUND BY THE TERMS OF THIS AGREEMENT.�
IF YOU DO NOT AGREE TO THE TERMS AND CONDITIONS OF THIS AGREEMENT, THEN
YOU SHOULD NOT INSTALL ANY OF THE LICENSED SOFTWARE.
NOTE: Unless
you have purchased an OEM License or an Internal Use License, your usage of any
Licensed Software and related Documentation is governed by an Evaluation
License.
In addition to the foregoing, the terms and conditions
of this Agreement include the following:
The
following terms and variations thereof shall have the following meanings:
�Agreement� means this
Software License Agreement between Northwoods and Customer.
�Customer� means you, the
individual or single entity in whose name the License Certificate was issued.
�Developer� means, with respect to a particular Licensed Product, an Internal User who
(a) is a member of the Licensed Group for such Licensed Product and (b) uses such
Licensed Product to develop one or more Licensed Applications.
�Documentation� means, with
respect to any Licensed Software, such assistance manuals, online help files,
release notes, Sample Code, or other materials, in printed or electronic form, including
any Updates thereof, that may be provided by Northwoods to assist a Developer in
the use of such Licensed Software.
�Domain Name� means a unique name
that identifies an Internet resource, such as a web site (e.g., www.nwoods.com).
�Evaluation License� means a License permitting
Customer to use a Licensed Product in accordance with the provisions of Section
2.1.1(a) below and the further terms and conditions of this Agreement.
�External User� means someone other than an Internal User.
�Intellectual
Property Right� means any U.S. or foreign patent, copyright,
trade secret, trademark, industrial property, or other proprietary or
intellectual property right of any kind.
�Internal Use
License�
means a License permitting Customer to use a Licensed Product in accordance
with the provisions of Section 2.1.1(b) below and the further terms and
conditions of this Agreement.
�Internal User� means an employee or
contractor of Customer.� For purposes hereof, �contractor� means
someone who is not an employee of Customer but
who is under contract with Customer to perform services of a type that
otherwise might be performed by an employee of Customer.
�License� means Northwoods�
grant to you of a non-exclusive, non-transferable right to use a Licensed
Product, subject to and in accordance with the terms and conditions of this
Agreement.� There are three different
types of Licenses - an Evaluation License, an Internal Use License, and an OEM
License.
�License
Certificate�
means, with respect to a particular Licensed Product that is licensed by
Northwoods to Customer under this Agreement, a certificate issued by Northwoods
to Customer that identifies the applicable Licensed Software and the License-Specific
Terms applicable to Customer�s use of such Licensed Product.
�License Effective
Date�
means the date on which Customer first installs any Licensed Software on a
computer for evaluation purposes, or, if the Customer purchased an Internal Use
License or an OEM License, the date on which Customer placed the order therefor.
�License-Specific
Terms� means, with respect to a
particular Licensed Product that is licensed by Northwoods to Customer under
this Agreement, the identity of the applicable Licensed Software that is part
of such Licensed Product together with certain additional licensing terms
applicable to Customer�s use of such Licensed Product that are set forth in the
License Certificate for such Licensed Product.�
The License-Specific Terms are recorded in Northwoods�
records.� In the event of any
inconsistency between the License-Specific Terms contained in Northwoods�
records and the License-Specific Terms stated in any printed,
electronic, or other copy of a License
Certificate (whether due to an alteration of such License Certificate or other
cause), the License-Specific Terms contained in Northwoods� records shall be
controlling.
�License Term� means the
duration of the License, which depends on the type of License and the License-Specific
Terms, all as more particularly set forth in this Agreement.
�Licensed
Application�
means a software application (including Redistributables) developed by a
Developer by use of the Licensed Software.�
The License-Specific Terms may further define what constitutes a
Licensed Application.
�Licensed
Application End User� means an authorized user of a Licensed Application.
�Licensed Domain� means a Domain
Name from which a Licensed Application End User is able to access a Licensed
Application via the Internet.� For the
avoidance of doubt, if two or more Domain Names identify the same web site or
other Internet resource (i.e., there is a single primary Domain Name from which
a Licensed Application End User is able to access a Licensed Application via
the Internet and there are also one or more alias Domain Names that point to that
same primary Domain Name), then there will only be considered to be one
Licensed Domain and the alias Domain Name(s) will not be counted.
�Licensed
Group� means, with respect to a
particular Licensed Product, such Internal Users who are permitted to be
Developers for such Licensed Product, as set forth in the License Certificate
for such Licensed Product.� By way of
examples, if the License Certificate for a Licensed Product states that the
Licensed Group for such Licensed Product (a) is a particular business unit
within Customer, only an Internal User within such business unit may be a
Developer for such Licensed Product, or (b) is unlimited, any Internal User of
Customer may be a Developer for such Licensed Product, in both cases subject to
such additional limitations as are otherwise set forth in this Agreement and the
applicable License Certificate (including any limitation on the number of
Developers who may develop Licensed Applications for such Licensed Product).
�Licensed Product� means, collectively, Licensed Software that
is licensed by Northwoods for use by Customer under this Agreement and the related
Documentation for such Licensed Software.
�Licensed
Software�
means any Northwoods� computer software product licensed for use under this
Agreement, including any Updates of such computer software product that may be
supplied to Customer by Northwoods.� The
Licensed Software is identified in the License-Specific Terms.
�Northwoods� means Northwoods
Software Corporation, a New Hampshire corporation, and its successors and
assigns.
�Object Code�
means, with respect to software, an encoded form of such software that allows
such software to be used on a computer, but which is not intended to allow such
software to be enhanced or otherwise modified.
�OEM License� means a License
permitting Customer to use a Licensed Product in accordance with the provisions
of Section 2.1.1(c) below and the further terms and conditions of this
Agreement.
�Redistributables� means
(a) the Object Code form of portions of the Licensed Software, which portions
are described as such in the Documentation and are usually provided as Dynamic
Link Libraries (DLL�s), tar files, zip files, JAR files, or obfuscated javascript
files (depending on the specific product), and (b) also the Source Code or Object
Code form of the Sample Code as originally supplied to, or as modified by,
Customer.� For the avoidance of doubt,
obfuscated javascript files are considered to be Object Code and not Source
Code.
�Sample
Code� means the Source Code version
of the computer software supplied by Northwoods and described as �sample code� in
the Documentation, which computer software is intended to illustrate how to use
the Licensed Software. For the avoidance of doubt, Sample Code is part of the
Documentation and not part of the Licensed Software.
�Source Code�
means, with respect to software, an encoded form of such software that allows a
software developer to enhance and otherwise modify such software and that can
be used, with certain software development tools, to produce Object Code.
�Trial Period� means, with respect to an Evaluation License, a period of thirty (30)
days following the
License Effective Date therefor or such
longer period of time, if any, as may be specified as the License Term for such
Evaluation License in the License-Specific Terms therefor.
�Update� means any bug
fix, correction, patch, workaround, enhancement, release, version, or other
update of a Licensed Product provided by Northwoods to Customer after the
initial delivery of such Licensed Product.
2.1�������� License Grant and Restrictions
2.1.1����� Subject to the further
terms and conditions of this Agreement, Northwoods grants to Customer a worldwide
License to use each Licensed Product, as follows:
(a)��������� Evaluation License.� If the License is an Evaluation License, then:
(i)��������� Customer
may only use the
Licensed Product for evaluation purposes; and
(ii)�������� the
License Term shall commence on the License Effective Date and shall continue
thereafter for the Trial Period, subject to termination of the License during
the License Term as otherwise set forth in this Agreement.
The
Licensed Software may include a duration limitation that tracks the License
Term and may disable the Licensed Software when the License Term expires.� If Customer purchases an Internal Use License
or an OEM License for the Licensed Product, Northwoods will provide Customer
with a software code which, when activated, will deactivate any such duration
limitation.
(b)��������� Internal Use License.� If the License is an Internal Use License,
then:
(i)��������� the
License Term shall commence on the License Effective Date and shall continue
thereafter for the period set forth in the License-Specific Terms, subject to
termination of the License during the License Term as otherwise set forth in
this Agreement;
(ii)�������� the
aggregate number of Developers who may use the Licensed Software to develop
Licensed Applications is specified in the License-Specific Terms;
(iii)������� the
aggregate number of Licensed Applications that such Developer(s) may develop is
specified in the License-Specific Terms;
(iv)������� all Licensed
Application End Users must be Internal Users;
(v)��������� the aggregate
number of Licensed Application End Users who are authorized to use each
Licensed Application is specified in the License-Specific Terms; and
(vi)������� for
those Licensed Products that enable Licensed Applications to be accessed via
the Internet, the aggregate number of Licensed Domains from which Licensed
Application End Users may access any such Licensed Application is specified in
the License-Specific Terms.
(c)��������� OEM
License.�
If the License is an OEM License, then:
(i)��������� the
License Term shall commence on the License Effective Date and shall continue
thereafter for the period set forth in the License-Specific Terms, subject to
termination of the License during the License Term as otherwise set forth in
this Agreement;
(ii)�������� the aggregate
number of Developers who may use the Licensed Software to develop Licensed
Applications is specified in the License-Specific Terms;
(iii)������� the aggregate
number of Licensed Applications that such Developer(s) may develop is specified
in the License-Specific Terms;
(iv)������� the Licensed
Application End Users may be Internal Users or External Users; and
(v)��������� the aggregate
number of Licensed Application End Users who are authorized to use each
Licensed Application is not limited; and
(vi)������� for
those Licensed Products that enable Licensed Applications to be accessed via
the Internet, the aggregate number of Licensed Domains from which Licensed
Application End Users may access any such Licensed Application is specified in
the License-Specific Terms.
For
the avoidance of doubt, upon the expiration or earlier termination of the
License Term (unless, and then only to the extent that, the License Term is
renewed by Northwoods), (A) no further Licensed Applications may be developed,
and (B) with respect to any Licensed Application that was developed prior to
such expiration or termination, any Licensed Application End User who was using
such Licensed Application prior to such expiration or termination may continue
to use such Licensed Application after such expiration or termination, but no other
Licensed Application End Users or anyone else may use such Licensed
Application.
(d)��������� The
parties agree that, for purposes of this Agreement, all Licensed Products shall
be delivered by Northwoods to Customer in the State of New Hampshire.
2.1.2����� Customer
may make such number of copies of each Licensed Product as may reasonably be
required for Customer�s exercise of its License rights and for archival
purposes.� Each such copy shall be and
remain subject to all usage and other restrictions applicable to such Licensed
Product under this Agreement.� All such copies
are and shall remain the sole property of Northwoods and subject to this Agreement.� All Intellectual
Property Rights notices included in such Licensed Product must be maintained in
all such copies and may not be altered or removed.
2.1.3����� Customer
is solely responsible for all hardware, infrastructure systems, and third party
software associated with operating the Licensed Software.
2.1.4����� Except
as may otherwise expressly be permitted by this Agreement, and subject to such
additional limitations and restrictions as are set forth in this Agreement, Customer may not:
(a)��������� use,
copy, display, publish, or transfer any Licensed Product;
(b)��������� modify
any Licensed Product, or create any derivative work of any Licensed Product;
(c)��������� reverse
engineer, disassemble, decompile, or take any other action to derive the Source
Code form of any of the Licensed Software;
(d)��������� use
any Licensed Product, nor permit any Licensed Product to be used, other than by one or more
Developers (the number of permitted Developers being specified in the License-Specific
Terms) to develop a Licensed Application;
(e)��������� rent,
lease, transfer, sell, sublicense, or distribute any Licensed Product thereof to
any third party without the express written consent of Northwoods; for the
avoidance of doubt, no time-sharing or service-sharing use of any Licensed
Product by any third party is permitted;
(f)��������� use
any Licensed Product to develop a Licensed Application unless Customer includes
substantial added value in such Licensed Application in addition to the
Redistributables;
(g)��������� use
any Licensed Product to develop a Licensed Application if such Licensed Application
would be competitive with such Licensed Product; nor
(h)��������� distribute
any portion of any Licensed Product other than the Redistributables, which may
only be distributed in Object Code form and only as part of a Licensed
Application.
2.1.5����� Except as otherwise set forth in this
Section, the Licensed Software is provided and may only be used in Object Code
form.� If the License-Specific Terms
expressly provide that any of the Licensed Software is being licensed with
Source Code rights, then such Licensed Software shall also be provided and may
be used in Source Code form.� In such
case, Customer:
(a)��������� may modify such Licensed Software and
use the modified Licensed Software in the same fashion, and subject to the same
restrictions, as the unmodified Licensed Software (however, for the avoidance
of doubt, Customer shall not redistribute any Source Code); and
(b)��������� shall defend, indemnify, and hold
harmless Northwoods and its affiliates, and its and their respective successors
and assigns, and all of the respective officers, directors, employees, stockholders,
managers, members, agents, and representatives of any of the foregoing (each,
an �Indemnitee�) from and against
any and all claims, losses, damages, liabilities, costs, and expenses
(including reasonable attorneys� and other professional fees) suffered or
incurred by Northwoods or any other Indemnitee that arise out of or relate to
any modifications of such Licensed Software made by Customer.
2.2.1����� With respect to each Licensed Product that
is listed in a License Certificate, the License of such Licensed Product shall commence
on the License Effective Date and shall continue thereafter for the applicable
License Term, subject to earlier termination as follows:
(a)��������� Customer may terminate such License at
any time and for any reason by written notice to Northwoods;
(b)��������� if
Customer breaches any of its obligations under this Agreement, then such License
shall automatically terminate; provided, that, if such breach is curable, then
such License shall terminate if such breach is not cured by Customer within
thirty (30) days of notice from Northwoods; and
(c)��������� if
Customer is declared bankrupt, becomes insolvent, or commences liquidation or
receivership proceedings, then such License may be terminated by Northwoods.
Upon termination of all License(s) granted under this Agreement,
this Agreement shall automatically terminate; provided, that the following
provisions of this Agreement shall survive any such termination:� Sections 1.0 (to the extent that any term
defined therein is used in any other Section which survives such termination),
2.2.2, 2.3, 2.4, 3.2, 4.0, 5.0, and 6.0.
2.2.2����� Upon
the expiration or earlier termination of such License, Customer shall:
(a)��������� immediately
cease
all use of such Licensed Product;
(b)��������� promptly
destroy all copies (including tangible, electronic, magnetic, and other copies)
of such Licensed Product; provided, that to the extent that Customer archives
electronic information in the ordinary course of its business, Customer shall
not be required to destroy such electronic copies of such Licensed Product as
are so included in such archives, so long as such electronic copies are not
otherwise copied or used by Customer, and
(c)��������� promptly certify in
writing to Northwoods that Customer has complied with its obligations hereunder
and is no longer using or in possession of any copy of such Licensed
Product.
2.3�������� Proprietary Rights
2.3.1����� Each
Licensed Product and all Intellectual Property Rights therein are the exclusive
property of Northwoods or its licensors.�
All rights in and to each Licensed Product not specifically granted to
Customer under this Agreement are reserved to Northwoods.
2.3.2����� Customer
shall not alter or remove any Intellectual Property Rights notices or any other
legal notices contained on or in copies of any Licensed Product.� If Customer is permitted by Northwoods to
make any copies of any Licensed Product, Customer shall reproduce all such
notices on or in all copies.� The
existence of any copyright notice shall not constitute publication and shall
not be construed as an admission or presumption of publication of any Licensed
Product.
2.3.3����� All
Updates of a Licensed Product provided by Northwoods (regardless of any
payments made by Customer therefor) shall belong to and be owned by Northwoods,
shall be considered to be part of such Licensed Product, and shall be licensed
to Customer on the same terms and conditions as are applicable to such Licensed
Product under this Agreement (including the License-Specific Terms).
2.4�������� Confidentiality
2.4.1����� Customer
agrees that each Licensed Product is confidential and proprietary to
Northwoods.� Customer agrees to hold each
Licensed Product in confidence and not to disclose such Licensed Product
without the prior written approval of Northwoods, except:
(a)��������� to
Customer�s Developer(s) to whom disclosure is necessary for Customer�s
permitted use of such Licensed Product, provided that (i) Customer shall ensure
that each such Developer agrees to comply with all of Customer�s obligations
under this Agreement, and (ii) the acts and omissions of Customer�s Developer(s)
shall be deemed to be the acts and omissions of Customer and Customer shall be
responsible therefor and for any breach of this Agreement caused thereby, or
(b)��������� as
required by applicable law, rule, or regulation, or by an order of a court or
governmental or law enforcement agency or other authority, each of competent
jurisdiction, provided that Customer shall have used reasonable efforts to
secure confidential treatment of any such information to be disclosed, or
(c)��������� that
Customer may distribute Redistributables (in Object Code form) as part of
Licensed Applications as permitted by Section 2.1.
2.4.2����� Customer
shall take all reasonable steps to safeguard all copies of each Licensed
Product and ensure that no persons, whether or not authorized to have access to
a Licensed Product, shall take any action in violation of this Agreement.
3.1�������� Limited Warranty.
(a)��������� If the License is an Internal
Use License or an OEM License, then Northwoods warrants (the �Limited Warranty�) that the
Licensed Software will, for a period of thirty (30) days following the date on
which the Licensed Software was first delivered to Customer (the �Limited Warranty Period�),
function substantially as set forth in the Documentation therefor.� The Limited Warranty is only for the benefit
of Customer.� The Limited Warranty shall
not apply to an Evaluation License.
(b)��������� Customer�s sole and
exclusive remedy for any breach of the Limited Warranty shall be as follows:
(i)��������� If
the Limited Warranty is breached, Customer must, during the Limited Warranty
Period, notify Northwoods in writing of the non-conformity in the Licensed Software
that constitutes the breach.
(ii)�������� In
the event such a notification is given to Northwoods during the Limited
Warranty Period, Northwoods will attempt to verify the non-conformity reported
by Customer and, if verified, ascertain the reason for the non-conformity and
supply a correction or bypass.
(iii)������� If
Northwoods verifies the reported non-conformity but is unable to repair or
replace the defective Licensed Software, or determines that such repair or
replacement is impractical in Northwoods� sole judgment, then Northwoods may
terminate the License by providing written notice thereof to Customer.� Likewise, if Northwoods verifies the reported
non-conformity but fails to repair or replace the defective Licensed Software within
thirty (30) days after Northwoods� receipt of Customer�s notice of the breach,
then, during the continuance of such failure, Customer may elect to terminate
the License by providing written notice thereof to Northwoods.� In the event of any such termination,
Customer shall comply with its obligations under Section 2.2.2 and, upon
Northwoods� receipt of Customer�s written certification pursuant to Section
2.2.2(c), Northwoods shall refund to Customer the License fee paid by Customer
for the defective Licensed Product.
(c)��������� The Limited Warranty
shall not apply if any breach of the Limited Warranty is due to: (i) the use of
the Licensed Software other than in accordance with the Documentation; or (ii)
any modification of the Licensed Software other than an Update provided by
Northwoods during the Limited Warranty Period.
3.2�������� Disclaimers.
(a)��������� All software contains
errors, and Customer acknowledges that the use of any software (including the
Licensed Software) entails the likelihood of some human and machine errors,
omissions, delays, interruptions, and losses, including inadvertent loss of
data or damage to media, which may give rise to loss or damage.� Accordingly, Northwoods makes no warranty that the Licensed Software is
error-free.
(b)��������� NORTHWOODS ALSO MAKES
NO WARRANTY THAT ANY LICENSED PRODUCT WILL MEET CUSTOMER�S REQUIREMENTS.
(c)��������� EXCEPT FOR THE
LIMITED WARRANTY (WHICH APPLIES ONLY TO AN INTERNAL USE LICENSE AND AN OEM
LICENSE, AND NOT TO AN EVALUATION LICENSE), EACH LICENSED PRODUCT IS PROVIDED
�AS IS� AND NORTHWOODS MAKES NO WARRANTIES, EXPRESS OR IMPLIED, WITH RESPECT TO
ANY LICENSED PRODUCT.� WITHOUT LIMITING
THE GENERALITY OF THE FOREGOING, NORTHWOODS DISCLAIMS AND EXCLUDES ANY AND ALL
IMPLIED WARRANTIES, INCLUDING ANY IMPLIED WARRANTIES OF MERCHANTABILITY,
FITNESS FOR A PARTICULAR PURPOSE, NON-INFRINGEMENT, AND ANY OTHER IMPLIED
WARRANTY ARISING OUT OF OR IN CONNECTION WITH THE DELIVERY, USE, OR PERFORMANCE
OF ANY LICENSED PRODUCT.
4.1�������� THE
TOTAL LIABILITY OF NORTHWOODS UNDER THIS AGREEMENT (INCLUDING AS A RESULT OF A
BREACH OF ANY OF NORTHWOODS� OBLIGATIONS HEREUNDER AND/OR FOR THE DELIVERY,
USE, PERFORMANCE, OR NON-PERFORMANCE OF ANY LICENSED PRODUCT), WHETHER ARISING
IN CONTRACT, NEGLIGENCE, STRICT LIABILITY, TORT, OR OTHER CLAIM OR ACTION, SHALL
BE LIMITED TO THE DIRECT LOSSES AND DAMAGES SUFFERED BY CUSTOMER THAT ARE
OTHERWISE RECOVERABLE UNDER THIS AGREEMENT, IN AN AMOUNT NOT TO EXCEED THE SUM
OF TEN DOLLARS ($10.00).
4.2�������� NORTHWOODS
NEITHER ASSUMES, NOR AUTHORIZES ANY OTHER PERSON TO ASSUME ON NORTHWOODS�
BEHALF, ANY LIABILITIES IN ADDITION TO THOSE LIABILITIES OF NORTHWOODS
SPECIFICALLY SET FORTH IN THIS AGREEMENT.
4.3�������� Except
as otherwise expressly set forth in Section 3.1(b)(iii), ALL AMOUNTS PAID BY
CUSTOMER TO NORTHWOODS ARE NON-REFUNDABLE.
4.5�������� Customer
is responsible for any and all uses of each Licensed Product (including testing
of the same to determine whether it does or does not meet Customer�s
requirements, and in the case of the Sample Code that any Open Source Software
referenced therein has acceptable license terms), and for the distribution and
use of any Redistributables as part of Licensed Applications.� Customer agrees that Northwoods shall have no
liability or responsibility for any use of any Redistributable as part of any Licensed
Application, and Customer shall defend, indemnify, and hold harmless Northwoods
and all other Indemnitees from and against any and all claims, losses, damages,
liabilities, costs, and expenses (including reasonable attorneys� and other
professional fees) that arise out of or relate to any such uses.
4.6�������� Customer
acknowledges that the limitations on Northwoods� liability set forth in this
Agreement are a material part of the consideration payable by Customer to
Northwoods under this Agreement and that Northwoods would not have entered into
this Agreement without such limitations.
5.1�������� Customer
is solely responsible for any and all sales, use, and other taxes and
governmental charges applicable to this Agreement and/or each Licensed Product,
including the transfer of any media and/or data.� Notwithstanding the foregoing, in no event
shall Customer be responsible for any taxes based on the net income of
Northwoods.
5.2�������� Customer may not export or otherwise
use any Licensed Product or any Redistributable except as authorized by United
States law and the laws of the jurisdiction(s) in which such Licensed Product
or Redistributable is to be used.� In
particular, but without limitation, no Licensed Product or Redistributable may
be exported or re-exported (a) into any U.S. embargoed countries or (b) to
anyone on the U.S. Treasury Department's list of Specially Designated Nationals
or the U.S. Department of Commerce Denied Person�s List or Entity List.� Customer represents and warrants that
Customer is not located in any such country or on any such list.�
5.3�������� If
any Licensed Product is licensed to or for use by the U.S. Government or any
agency thereof, the following provisions shall apply:� Such license and usage rights include only
those rights expressly set forth in this Agreement (which are the rights customarily
provided by Northwoods to the public) and do not include any additional rights
to use, modify, reproduce, release, perform, display, or disclose any Licensed
Product or Redistributable.� All Licensed
Software and Redistributables are �Commercial Computer Software�, and all
Documentation is �Commercial Computer Software Documentation�, within the
meaning of the applicable civilian and military Federal acquisition regulations
and any supplement thereto.� If a
government agency has a need for rights not conveyed under these terms, it must
negotiate with Northwoods to determine if there are acceptable terms for
transferring such rights, and a mutually acceptable written addendum
specifically conveying such rights must be executed and delivered by Northwoods
and the government agency.� The
contractor/manufacturer is Northwoods Software Corporation, 142 Main Street,
Nashua, New Hampshire, USA.
5.4�������� All unpublished
rights are reserved under the copyright laws of the United States and all
applicable foreign countries.
6.1�������� Governing
Law; Jurisdiction.
(a)��������� This Agreement
shall be governed by and construed in accordance with the laws of the State of
New Hampshire, USA, without reference to its conflict of laws principles.� The provisions of the United Nations
Convention on Contracts for the International Sale of Goods are excluded.
(b)��������� The
parties agree that, in the event of any action for enforcement of or breach of
this Agreement, the Federal and State courts of the State of New Hampshire
shall have exclusive jurisdiction over the enforcement of this Agreement, and
the parties specifically consent to, and agree that they are subject to, the
jurisdiction of such courts; provided, that Northwoods shall be entitled to
seek injunctive or other equitable relief in any court of competent
jurisdiction.
6.2�������� Notices.� Except as otherwise specifically set forth
in this Agreement, all notices and other communications required to be given
under this Agreement shall be in writing and shall be deemed to have been
sufficiently given if sent by registered or certified mail, return receipt
requested, or by a nationally recognized express courier.� Any such notice (a) if given to Northwoods,
shall be sent to Northwoods at its address set forth on its web site (www.nwoods.com or any successor thereto), or
(b) if given to Customer, shall be sent to Customer at its address set forth in
the License-Specific Terms or such other address as Customer may have notified
Northwoods in writing.
6.3�������� Assignment.� This Agreement is assignable by
Northwoods.� This Agreement is
not assignable, in whole or in part, by Customer without the prior written
consent of Northwoods, and any assignment or attempted assignment of this
Agreement (including an assignment by operation of law) by Customer without
such consent shall be void and shall also constitute a breach of this Agreement;
provided, however, that Customer may assign this Agreement to a purchaser or
other acquirer of all or substantially all of Customer�s assets or business if,
within thirty (30) days following such assignment, said purchaser or acquirer
provides Northwoods with written notice of such permitted assignment and a
written certification signed by the purchaser or acquirer agreeing to be bound
by and perform all of Customer�s obligations under this Agreement.� This Agreement is binding on and for the
benefit of Customer and its permitted successors and assigns, as well as
Northwoods and its successors and assigns.
6.4�������� Enforceability.� Each provision of this Agreement shall be
valid and enforced to the fullest extent permitted by law.� If there is any conflict between any
provision of this Agreement and any statute, law, or governmental ordinance,
order, rule, or regulation, the latter shall prevail; provided, that any such
conflicting provision shall be curtailed and limited only to the extent
necessary to bring it within the legal requirements and the remainder of this
Agreement shall not be affected thereby.
6.5�������� Waiver.� The failure of any party to enforce any
term or condition of this Agreement shall not constitute a waiver of such
party�s right to enforce such term or condition or any other term or condition
of this Agreement, unless waived in writing.
6.6�������� Force Majeure.� Neither party will be liable for any failure
to perform any of such party�s obligations under this Agreement (excluding,
however, a party�s payment obligations) due to any causes beyond such party�s
reasonable control, including acts of God (including earthquakes and other
natural disasters), war, riot, embargoes, acts of civil or military
authorities, fire, flood, accident, and strikes.� In the event of any such cause, the affected
party�s time for delivery or other performance will be extended for a period
equal to the duration of the delay caused thereby.
6.7�������� Interpretation.� Section headings are inserted for convenience
of reference only and shall not affect the construction of this Agreement.� The singular number shall include the plural,
and vice versa.� Any use of the word �including� will be interpreted to mean
�including, but not limited to,� unless otherwise indicated.� References to any individual or entity shall
be construed to mean such individual or entity and his, her, or its successors
in interest and permitted assigns, as applicable.
6.8�������� Entire
Agreement.� This Agreement, including
the License-Specific Terms, (a) is the entire agreement between Northwoods and
Customer with respect to Northwoods� license to Customer of the Licensed
Product(s) and Customer�s right to use the same, and (b) supersedes all prior
agreements, covenants, understandings, representations, warranties, and
undertakings, whether written, electronic, or oral, between the parties
regarding such matters.
6.9�������� Amendments.� This Agreement may only be amended by a
writing duly executed and delivered by each party.
6.10������ Publicity.
Northwoods shall be permitted to include Customer�s name and logo in a list of
Northwoods other customers on a Northwoods� website. Neither party may issue
press releases including the other party�s name without prior written consent
of the other party.
Northwoods Software
Corporation
142 Main St. Nashua, NH 03060
USA
Internet: http://www.nwoods.com
E-mail: GoSales@nwoods.com
Copyright � 1999-2018
Northwoods Software Corporation. All rights reserved.
 [GoJS](https://gojs.net) is a JavaScript and TypeScript library for creating and manipulating diagrams, charts, and graphs.


[](https://twitter.com/NorthwoodsGo)
[See GoJS Samples](https://gojs.net/latest/samples)
[Get Started with GoJS](https://gojs.net/latest/learn)
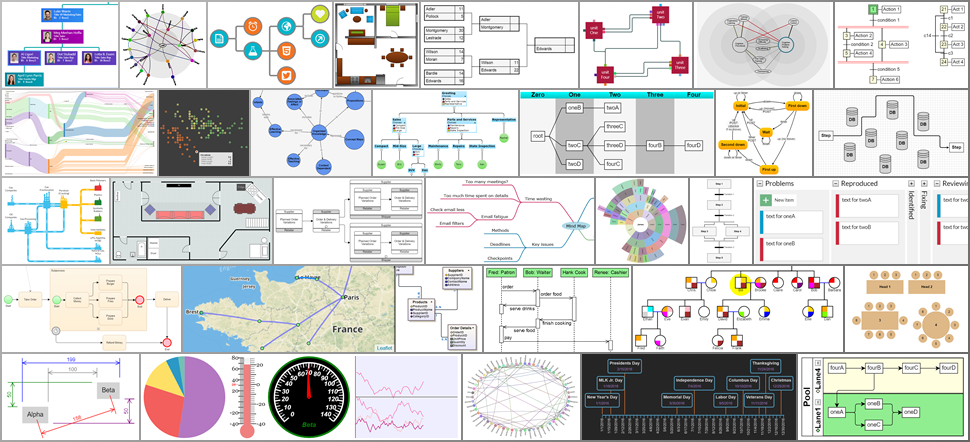
GoJS is a flexible library that can be used to create a number of different kinds of interactive diagrams, including data visualizations, drawing tools, and graph editors. There are samples for [flowchart](https://gojs.net/latest/samples/flowchart.html), [org chart](https://gojs.net/latest/samples/orgChartEditor.html), [business process BPMN](https://gojs.net/latest/extensions/BPMN.html), [swimlanes](https://gojs.net/latest/samples/swimlanes.html), [timelines](https://gojs.net/latest/samples/timeline.html), [state charts](https://gojs.net/latest/samples/statechart.html), [kanban](https://gojs.net/latest/samples/kanban.html), [network](https://gojs.net/latest/samples/network.html), [mindmap](https://gojs.net/latest/samples/mindMap.html), [sankey](https://gojs.net/latest/samples/sankey.html), [family trees](https://gojs.net/latest/samples/familyTree.html) and [genogram charts](https://gojs.net/latest/samples/genogram.html), [fishbone diagrams](https://gojs.net/latest/extensions/Fishbone.html), [floor plans](https://gojs.net/latest/projects/floorplanner/FloorPlanner.html), [UML](https://gojs.net/latest/samples/umlClass.html), [decision trees](https://gojs.net/latest/samples/decisionTree.html), [pert charts](https://gojs.net/latest/samples/PERT.html), [Gantt](https://gojs.net/latest/samples/gantt.html), and [hundreds more](https://gojs.net/latest/samples/index.html). GoJS includes a number of built in layouts including tree layout, force directed, radial, and layered digraph layout, and a number of custom layout examples.
GoJS is rendered with an HTML5 Canvas element (with export to SVG or image formats). GoJS can run in a web browser, or server side in [Node](https://nodejs.org/en/) or [Puppeteer](https://github.com/GoogleChrome/puppeteer). GoJS Diagrams are backed by Models, with saving and loading typically via JSON.
[
[GoJS](https://gojs.net) is a JavaScript and TypeScript library for creating and manipulating diagrams, charts, and graphs.


[](https://twitter.com/NorthwoodsGo)
[See GoJS Samples](https://gojs.net/latest/samples)
[Get Started with GoJS](https://gojs.net/latest/learn)
GoJS is a flexible library that can be used to create a number of different kinds of interactive diagrams, including data visualizations, drawing tools, and graph editors. There are samples for [flowchart](https://gojs.net/latest/samples/flowchart.html), [org chart](https://gojs.net/latest/samples/orgChartEditor.html), [business process BPMN](https://gojs.net/latest/extensions/BPMN.html), [swimlanes](https://gojs.net/latest/samples/swimlanes.html), [timelines](https://gojs.net/latest/samples/timeline.html), [state charts](https://gojs.net/latest/samples/statechart.html), [kanban](https://gojs.net/latest/samples/kanban.html), [network](https://gojs.net/latest/samples/network.html), [mindmap](https://gojs.net/latest/samples/mindMap.html), [sankey](https://gojs.net/latest/samples/sankey.html), [family trees](https://gojs.net/latest/samples/familyTree.html) and [genogram charts](https://gojs.net/latest/samples/genogram.html), [fishbone diagrams](https://gojs.net/latest/extensions/Fishbone.html), [floor plans](https://gojs.net/latest/projects/floorplanner/FloorPlanner.html), [UML](https://gojs.net/latest/samples/umlClass.html), [decision trees](https://gojs.net/latest/samples/decisionTree.html), [pert charts](https://gojs.net/latest/samples/PERT.html), [Gantt](https://gojs.net/latest/samples/gantt.html), and [hundreds more](https://gojs.net/latest/samples/index.html). GoJS includes a number of built in layouts including tree layout, force directed, radial, and layered digraph layout, and a number of custom layout examples.
GoJS is rendered with an HTML5 Canvas element (with export to SVG or image formats). GoJS can run in a web browser, or server side in [Node](https://nodejs.org/en/) or [Puppeteer](https://github.com/GoogleChrome/puppeteer). GoJS Diagrams are backed by Models, with saving and loading typically via JSON.
[ ](https://gojs.net/latest/samples/index.html)
Read more about GoJS at [gojs.net](https://gojs.net)
This repository contains both the library and the sources for all samples, extensions, and documentation.
You can use the GitHub repository to quickly [search through all of the sources](https://github.com/NorthwoodsSoftware/GoJS-Samples/search?q=setDataProperty&type=Code).
](https://gojs.net/latest/samples/index.html)
Read more about GoJS at [gojs.net](https://gojs.net)
This repository contains both the library and the sources for all samples, extensions, and documentation.
You can use the GitHub repository to quickly [search through all of the sources](https://github.com/NorthwoodsSoftware/GoJS-Samples/search?q=setDataProperty&type=Code).
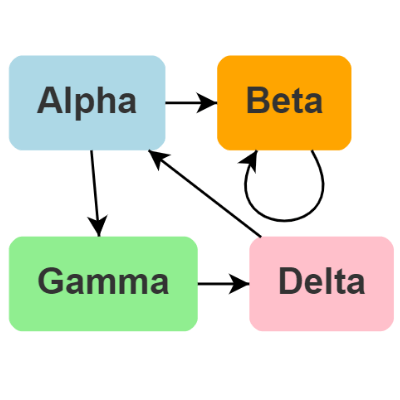 ](https://gojs.net/latest/samples/minimal.html)
*Click the image to see the interactive GoJS Diagram*
](https://gojs.net/latest/samples/minimal.html)
*Click the image to see the interactive GoJS Diagram*